Master Of The Elements
This is where we shall have some fun. Carving should be fun, when it becomes a chore its time to give up.
This piece is based on the Oriental's belief that the Dragon is the Master of the elements and there for we shall be carving a Dragon that symbolizes this concept using traditional oriental motifs to convey our feelings in the construction of this interpretation of an ancient belief.
You do not have to follow my design to the letter, this exercise is not to create exact duplicates of my sculpture but to show you how easy it is to create your own.
I will put up pictures of the individual components of the sculpture showing how they were formed but it is up to you how and where you place yours.
|
TO START
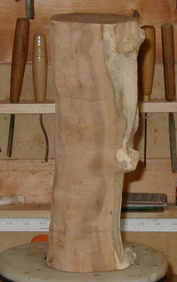
To start you will need a piece of timber; preferably a piece of branch wood. I am going to use a piece of Golden Acacia size 12 x 4 x 4 inch , but you may use what ever you wish as long as it is a hard wood that will take detail. The size of your timber is not important as we will not be making any drawings or plans THIS IS A FREE FORM SCULPTURE so choose the timber to the dimensions that you feel comfortable working with. |
|
Lets Start
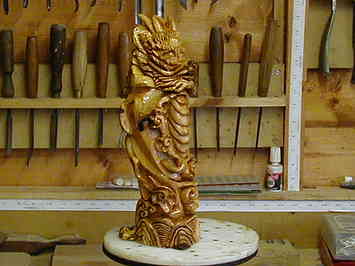
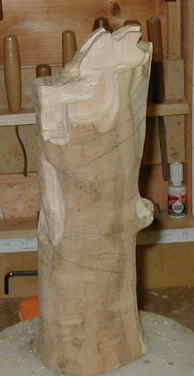
Lets start at the end. Yes! I know, but you do not think that I would actualy do the lesson live do you??.But it may help you to start if you can visualize what we are trying to create This is what we shall end up with, or something very similar.I hope!! If you feel that you need to do some rough sketches then please do so, I know my subject well and am happy to carve this way but this was not always the case.
You will start by removing the bark from your log.
I personally like to define the size of the Dragons head so as to give my self a guide to the proportions for the rest of the sculpture. So you will all be joining me in my little foible and starting here. Good "aint it" |
|
To define the head
You may use what ever tools you like, I am going to use a rotary cutter in my Foredom to define the main areas. At this stage in a sculpture I prefer to remove the waste timber as fast as I can, and a rotary cutter will do this with the added bonus it will not split the wood.
The idea is to portray a Dragon rising up out of the water in a swirl of clouds, using the shape of your branch to help achieve this effect
|
|
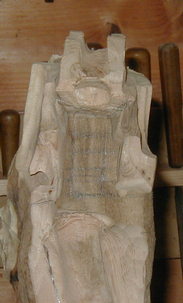
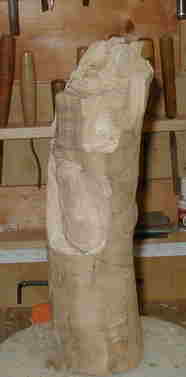
The First Cuts
To define the head first mark a center line on your log then about a quarter of the way in from the out side of the log is the outer edge of the horns, mark this line in. The horns are usualy another quarter in, in dimension this will leave a section in the middle aproximatly one third of the logs diameter for the mellon or forehead of your dragon. This middle section will run to the front or nose tip of the head and will give you the dimension for the outer width of the Dragons snout.
Refer to the photos on page two for help.
|
|
Getting the size right
Ok, remove a groove of timber between the horns to give them depth. Then on the side of the head about inline with where the upper horn splits from the main horn and level with the eye brow of the dragon is the start of the ear. As you cut down remember to leave some timber for this appendidge.
If you are going to have the dragons mouth open then you should aim for a shape simular to this photo ,but remember to leave timber for the long whiskers and beard. Also, at the sides of the dragon you will need to allow for the hair.
You can at this stage draw in some lines for the direction of the clouds and mark in where you would like the dragons body to breach the clouds.
|
|
Cutting in the first link of the Dragons body
Do not put in detail to the head yet; mark in the Dragons body parts where you wish them to show and cut them in , do not be shy, cut deep.
Think about the clouds and water and if you like draw them in, if the wood has some nice features lumps, burl or such try and work them into your design play with the design, enjoy yourselves, experiment, try something different.
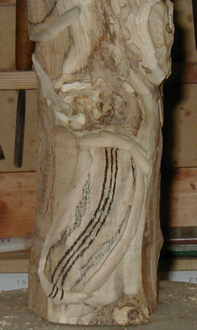
About a tenth of the way up from the base will be the top of the stylised waves you can also add larger waves as well should you wish, lightly cut in the lines around the main detail points and when you are happy with the efect cut them in to the depth you require, once again do not be shy cut deep and aim for a contrast of levels after all this is a sculpture, think in 3D.
|
|
Putting in the detail
As in the picture here mark in the lines for the dragons spine and on the front his breast plates. Cut away the wood so you get a good depth for the ridges then mark and cut them in. To make the scales choose a gouge the size you would like the scales to be and then tap the gouge straight into the timber. When you have finished you take a small chisel and remove a small piece of timber from the from the front of each scale. You can now start to add detail or form to the sculpture. Cut in the cloud shapes and the waves. If you under cut the clouds deeply this will give a very good effect.On the head remember to give the hair some life of its own. |
|