Go to a woodworking show and have a look at the tools, talk to the people who make them, handle the tools, ask to try them. If its a mallet, pick it up, see how it feels, try it out, is the handle comfortable? Do not be afraid to ask, after all if they will not let you try out the tools ask your self why!! Better still ask them what they are afraid of, you certainly should not be able to damage a mallet just by hitting a chisel with it, niether should you be able to damage a chisel by cutting some wood with it.
Good Quality Mallets are just as important as your chisels
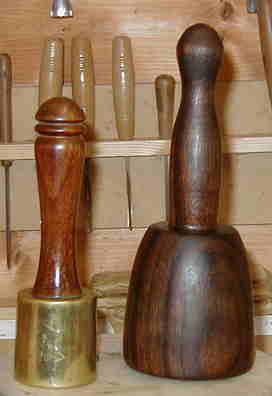
Often overlooked and given little consideration by the foolhardy. This tool will become one of the most important tools you have, and you will either love or hate it. WHY!!? Well, this tool will be in your hand for longer than any chisel, and if it is too heavy, too light, or not strong enough then you will not be able to work with it. The two mallets shown are a Laurel wood mallet turned from one piece, approx 500g, and a brass headed mallet used where I need a precise dead strike at 850g or nearly 2lb. These two I use all the time and are right for me, but you may not like the weight or feel of them. Note the size difference, the brass mallet is used by holding the brass head in the palm of your hand and then tapping the chisel with it. If you swing it by the handle you will get either your chisel stuck in the wood or the handle of your chisel split, or both. Take care of your mallet. The Laurel wood mallet is oiled with a light oil once a week. I use Australian orange oil, it keeps it clean and in good condition, and the brass mallet, well I oil this as well. A TIP If you buy a mallet, the most common seem to be Ligman vitae, and there is nothing wrong with that, but, the hardest of them are made from the dark almost black heart wood, so you know which to choose, yes!!
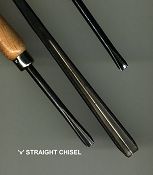
Buying Chisels
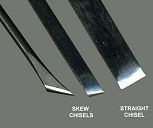
Choose as good a quality chisel as you can afford. You do not have to rush out and buy a whole set at once. To start all you will need are a couple of gouges, one small and a medium and if you like a large gouge, a couple of sraight chisels one small and a larger one say about an inch across, then to finish off your starter set a vee chisel, go for something mid size to start with. When you choose your chisels I would suggest that you make sure they are honed ready for use, and if you can try them out first all the better. As with the mallets, pick up the tool and see how it feels, take a good look at it, is it long enough, does the handle feel comfortable. Chisels normaly come in three sizes micro, ladies and professional.
Do not rush out and buy the first set you see
I can not stress this point to often. You do not need nor do you have to buy a complete set of chisels, Buy a starter set if you must then add to them one by one as you go.
Look after your chisels
You can never take to much care of your tools. When you have finished with them give them a quick wipe with a lightly oiled rag before you put them away. You will not normaly have to do any more than strop your chisel to keep it sharp, only put it to the stone if it really needs it and you are confident you know what you are doing. You should not have to re-sharpen your chisels unless you chip the edge of them or you wish to alter the shape. Have some lessons on sharpening, they will save you far more than they cost.
Once you have the basics you can add to them
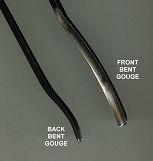
Long, short, back bent, front bent, hook and skew, pattern makers, Chinese, or Japanese, they will not all be for you. The choice you come across as you amble along will be bewildering, every one will extoll the virtues of a particular type, make or countrys chisels. My advice to you is if you can do with out, then do not buy it. If you are going to use it a lot then try it first, if you only need it for one job and you can afford to buy a chisel that you will never use again then be my guest and buy it (I can give you my address to send your expensive unwanted chisels to). Another way to get yourself some tools is at antique and collectors fairs I have just purchased myself a nice set of spoon chisels 12 in total in a large frame for 30 pounds stirling thats 2 pounds 50p each only one of which will need some restoration ( a new handle ) A TIP If you do buy second hand make sure the tool is in good condition or if not then in a condition which you can repair yourself, a little sharpening or a new handle is fine but can you regrind a chisel or is it even worth it ?.
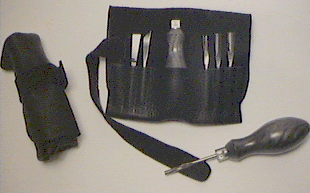
A little starter set from Cape Forge
Hand made with an interchangable handle, a tool roll, and a guarantee and all for $ 89. This set would be ideal to start with and contains all you need to carve the Dragon in my lesson. Click on the picture for more information.
Grinders
To take a forty pound or dollar chisel to an electric grinder without training, you must be supremely confident, or totally ignorant of the consequences. Your chisel will have been hardened and temperd before you got it and it does not take much to ruin the temper of the steel. The fastest way to ruin your chisel is to use a bench grinder. I have operated hardening furnaces, and temperd steel, and believe me it is not easy to repair, or usually worth the effort and time.
A little more information and a cheap alternative
You will need something to hold your work. You can get all manner of holding devises from the cheapest to the dearest, all have their good and bad points. What I would suggest you look for to start is, first think how you wish to place your clamp ! will it be permanently fixed, or will you need to move it, can you get to your sculpture, can you rotate the work plate to carve 360 degrees?, can you adjust the height or tilt of your work piece. Is the thing strong enough to take the weight of your timber and survive you pounding at it for hours, days, etc with your mallet. Make sure you get a good warranty with it. Take your time in choosing, look at a selection and ask every question you can think of about it before you buy. Although I do have and use a heavy duty clamp, a lot of my work is done on a sand bag. Yes I said a sand bag !! I have found that working with a clamp for me on my lighter work is too restrictive, so I use a sand bag. Now I bet I have caught your curiosity with this one, yes !. Okay, this is the details on how to make a sand bag for carving. You will need- Sand, dry the sand by putting it in the bottom of your oven, heat it until dry, it should contain no moisture at all. You will need a heavy cotton bag to put the sand in. Think about the size work you will be doing, the piece should rest comfortable on the bag and you should aim to have about 3 to 4 inches in depth of sand. You will not have too tight a bag, the sand must be able to give a little, to mould to the shape of your work. You will then need a piece of leather big enough to go around the bag, and some means of sealing the edges of the leather.
Oh yes, let the sand cool before you use it, it will be hot, and it will stay hot for quite a while. I can not believe that some of you did not realise this.
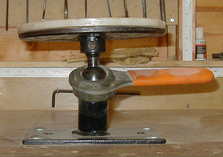
Work Holders
There are almost as many types of work holder as there are chisels. Go for one that gives you all round access to your work, and that can be tilted in all directions as well. Make sure it is strong enough to hold your work, and that it will take a lot of pounding. Once again, buy the best quality you can afford and make sure you get a good guarantee. If they cannot give you a guarantee then they cannot have much faith in their product.
Above is a picture of a work holder, this one is built around a ball joint that is used on JCBs, I have had this one for so long now I can not remember when I bought it. It will take weights far heavier than any thing I will ever need to put on it, and has already stood up to many years of pounding. The Face plate can be changed and comes in two sizes, very handy should you wish to work on more than one sculpture. TIP You can see a white plastic type circle I have screwed to the top of the face plate; this is slightly larger than the metal face plate and should I slip when carving near the base will protect the chisel from the metal. Make them out of scraps of ply, hardboard, wood or what ever.
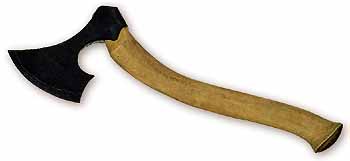
Axe Or to be precise A Swedish axe by Stefan Ronnquist In Sweden beautiful functional axe's perfect for sculpting are still hand made and if you are going to carve large sculptures or log wood, these are wonderful tools and are more than capable of quite delicate work, or you could resort to a chain saw but I know which I prefer to use.
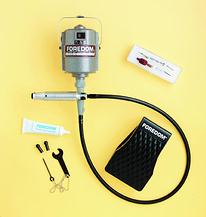
Rotary Carvers
These machines have made it possible to do work with timbers that would be impossible with conventianal tools. Saying that, as with every thing there are good and bad. I have used a Foredom now for five years and have had no problems with it, other than to change the bushes and shaft. Although I do not use the reverse feature on mine very often I would not be without it.
If you use a power carver or power tools YOU WILL NEED DUST EXTRACTION
The dust from many timbers is hazardous to your health and can cause all sorts of respiratory problems, and Cancers. It can also cause skin problems. I can testify to this first hand as I react violently to the dust from English Yew, believe me, not being able to breath and coming up in what looked and felt like the biggest nettle rash in the world on every piece of exposed skin is neither nice or very pretty, and does nothing for your self asteem. You can get dust extraction units for very little cost, or you can make your own. Personally speaking, I do not think you can leave out this very important piece of equipment. If you have to work without one, then wear a suitable dust mask. I wear a dust mask even though I use dust extraction equipment.
SO HOW DO YOU STROP THOSE NEW TOOLS
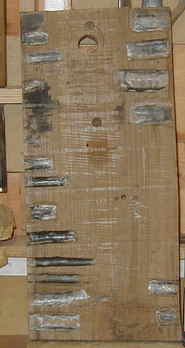
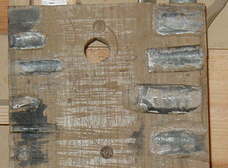
Right, so you do not know how to keep that razor edge on your new gouges !! You go out and spend a lot of money on on some new equpment and learn how to use it, what!! you do not like this idea ?? Well, you could always make a jig of your own for little or no money at all. Does that sound better ??. Right, you will need a piece of clear hardwood, any hard wood will do as long as its close grained. The piece I have used is a piece of Walnut 14x8x7/8, the thickness is the only important dimension, I just happend to have this piece in my off cuts box. You can plane or sand the face you are going to use. As you can see from the picture I couldn't be bothered!
Instructions
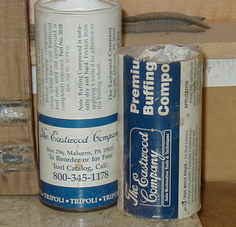
You take one of your new gouges and starting from the edge cut into the board about two or three inches. Keep your gouge level. Keep doing this until the top of your gouge is level with the surface of your board, this will give you a groove the precise shape of your gouge. Good, now turn your gouge over and starting about a third of an inch further down the board repeat the process. When you have finished you will have two grooves, a top and bottom mirror image of your gouge. Mark the timber so you know which gouge made the grooves and repeat this process for the rest of your gouges / v chisels. When you have done you will need some buffing compound. Place a little compound in the groove, lay your gouge in the groove and pull it towards you keeping a gentle but firm preasure on the gouge. The groove will turn black, pull the gouge towards you in this fashion about four times, then repeat for the other side. Wipe of any residue on your gouge and you are done. I buy my compound from Eastwood, a car renovation supply company. You get a huge tube of buffing compound for about a quarter of the cost from a woodcarving tool supplier.