As you progress with your sculptures there will come a time when you wish to carve something different, and for a challenge why not try a big burl wall sculpture !??. Yes this may seem mad but it only presents you with a few minor diffaculties to overcome. The first will be the weight, no light things these burls, then there is the shape. "Most burls comes natural and that ain't funny dude!!" as you have then to work out your design to take advantage of the largest possible amount of usable timber.
To Start
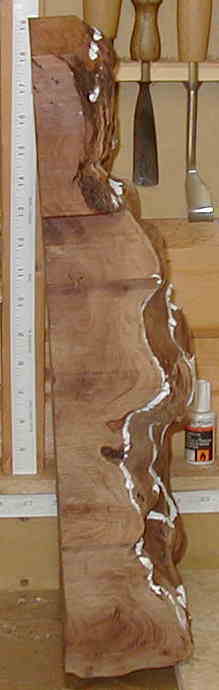
This burl was not too bad, to start with I just cut out some soft wood and bark and flattened off the few lumps that were there as I would not be using them on this Dragon. Some of the natural faults in the timber came up around the sides but as this would add to my design I left them alone. The white lines are made with liquid paper,(correction fluid) this does not rub off like chalk, and does not soak into your wood. The Areas marked with the white lines are the low points and my rough shape of the dragon, at the moment it is just an idea that will need a lot of fleshing out. I transferd the outline on to a large sheet of paper on a 1 to 1 ratio and then designed my dragon to fit within the usable area of timber. This burl had a large area of quite hard but reasonably clear timber where I would position the head. If this carved as I think it will I would be able to put a fair amount of detail here.
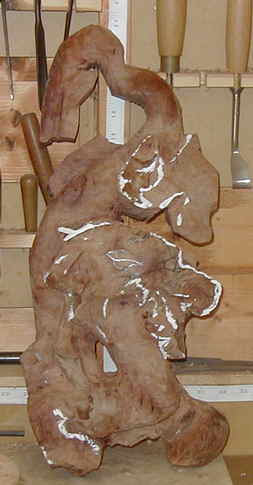
Take a note of the burls shape, the form of the dragon can clearly be seen. Use what nature has provided, this will make your work a lot easier and give it a more natural look. The two nodes at the bottom of the burl were in the perfect position for my dragons feet, so why ignore such a gift if nature is willing to help you design.
You can with practise learn to visualise the sculpture within the wood.
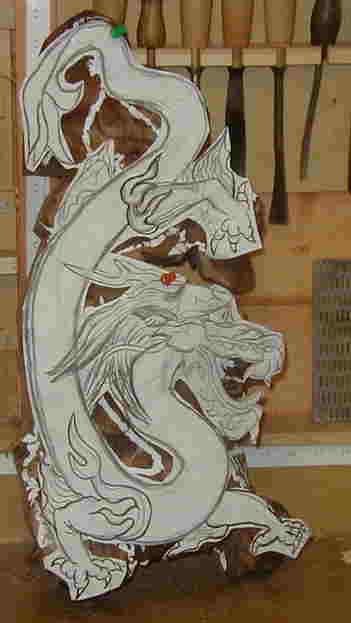
The next stage
Take the dragon design and place it over the timber, it may help to cut out the drawing to get a better perspective, now is the time to make any alterations to your design make sure that you have enough timber under the template to be able to carve in the limbs and such. If you do not then you can alter the design now on the paper and try again. Once you have your design as you would like it mark off the main areas of your sculpture, for example the head, the legs and the main body mass. When you are happy with the shape we can go to the next stage. Remember, a burl will not need too much detail so make your design bold and simple, allow the timber to provide the detail and thus make your work easier. If you are confident enough then by all means draw your dragon straight onto the burl. Note the feet designed to use the nodes.
The side view
This view gives you some idea of how the grain is running through the burl as you can see the grain runs in all directions, it also shows the depth you have to work with. When you cut out the dragon on the band saw save all the scraps, you may need them later. When you cut out the waste wood do not cut right up to the lines, give yourself a little leeway. If you intend to sculpt your dragon with out cutting on the bandsaw it would still be a good idea to begin your carving out side the lines and round over your body shape as you go. You can always remove a little more timber if you need, but you will not find it so easy to put some back.
This is where you start to work
You can see the blocked in areas of the limbs and head and that the main areas of the timber are being taken down to the required levels. I have left a large area around each to allow for shaping in, on this dragon I left between a 1/2 to 1 inch. This is important and should you need to move something slightly a very good practice to keep up. To aid with the cutting out I drilled holes with a 7/8 flat bit in the tail area to help in turning the bandsaw blade, and in the middle between the head and leg to make it easier to chisel out the waste wood. The nodes that I had incorporated into the design for the feet had a lot of wild grain running through them, and were also a little brittle and would not be able to take too much fine work. This was not too much of a problem as I designed the toes with a large amount of surpporting timber behind. This gives the impression that they are fully carved and thin.
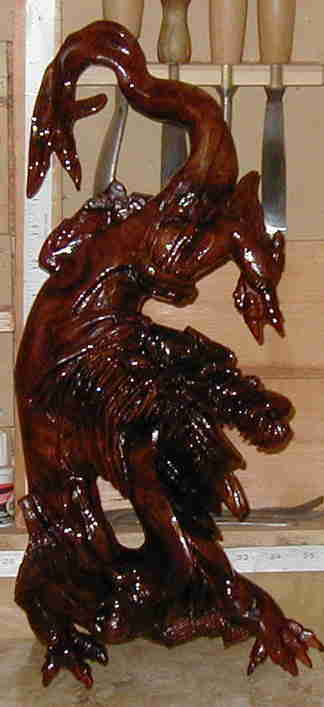
This is it
Weighing in at 81/2 lb, and all shiny from the numerous coats of laquer. The laquer is thinned and applied to the burl with a brush and allowed to soak in. Each coat is cut back with a light rub of 000 wire wool. The idea is to seal the burl and prevent too much movement. Once this laquer has hardened off fully it will be again cut back with wire wool and then given a finish of wax and oil, this will remove the hard shine of the laquer and give a soft warm glow to the sculpture. Tip The areas of the head that are well carved will be finished by mixing a soft bees wax with orange oil. You make the mix by adding an equal amount of oil to the wax, mix well untill they have combined then with a stiff soft brush, brush gently but firmly into the carved areas, allow to dry, the oil will dry and you can then buff the wax to a shine. The advantage of doing it this way is you get no waxy residue build up and a very mellow finish.