There are those who find sanding a pleasure, I do not!. The only part of sanding that I can with all honesty say I enjoy is the final rub. And so, to this end anything that can speed up this odious task is very welcome, Drum sanders, burrs, Offers of help! ?. anything Pleeeeeeeeease !!!!!
I feel like sanding will never end
Sanding Large open areas
Okay this is not too bad. Fit a course grade grit to your drum sander and apply it to the wood (switched on). Remember, the drum sander will shape timber as well as sand it, so do not apply pressure. When you have finished sanding the area, go to the next grade. Using a drum sander means you can now drop down to a much finer grade of paper. (I like this ) When you are done you will still need to do a little hand sanding. Taking a sheet of paper a grade lower than you have just used sand the area again. Now I have sticky backed rubber strip like they use for draft proofing, about 6 inch wide which I stick cloth backed sand paper to. This makes a very nice sanding pad. To finish I always like to buff the piece with the back of a piece of worn sand paper.
Small detail sanding
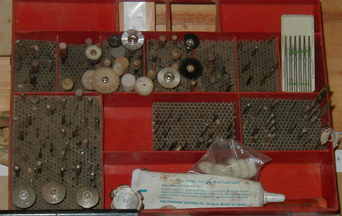
Here you can see a small collection of assorted rotary bits that I use for sanding and polishing detail. Diamond burrs, dental cutters, polishing stones and buffing wheels/shapes. I find that when you wish to sand over fine detail that the best way to do this is to use nylon brushes. These remove loose bits of wood and have a gentle abrasive action that does not destroy your work, or colour your timber. They also leave a slightly buffed finish. Small brass brushes tend to be a little too rough for this work. If when you oil your work you get a little furry area these brushes are just the thing to remove and polish up that area.
OIL and WAX finish
On most of my sculptures, the finish I choose is oil and wax, why?, because I like it. No, really, my smaller sculptures are not designed to be, or to have a lot of heavy handling so this finish is more than suitable. If they are intended for, or will be in a position where they will be touched a lot, then of course a different finish would be applied.
Sanding kit for small detail
OIL and WAX
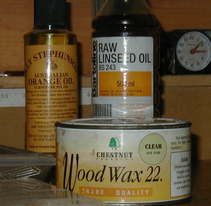
When you have finished sanding down your sculpture you can decide on how you are going to protect it. For indoor use where the sculpture is not going to be handled a lot I choose to oil and wax . This finish takes about a week to apply, you start by giving your sculpture a good coating of oil. I prefer to use raw linseed oil. Why ! ? Well raw linseed oil does not leave a hard shiny crust on your timber but soaks right into the wood. You can apply the oil with a cloth or brush, it does not matter just make sure you get into all the little nooks and crannies then wipe off the excess oil and leave overnight. When you look at your sculpture the next day you may find some of the grain has raised in the fine detail areas and you have little furry areas. This is where you did not sand properly, so now you can finish that job. Lightly sand your sculpture, a gently rub with some very fine steel wool over the large areas is all you need, and a gentle brush over the fine detail with the nylon brushes,then oil again and remove the excess. Do this for about a week or 5 times. You can now apply the wax.
Choose a soft wax,first apply in small amounts do one area at a time.
Apply wax to the body while it drys apply wax to one of the legs. If you have trouble in the detail use a hard bristle tooth brush I like those with the bendy heads to apply the wax. any way while the wax on the leg drys buff up the body and so on. As I mentioned before I like tools and those little polishing mops really come into their own here gently but firmly (at a medium speed or you will make burn marks ) apply your clean mop to the waxed area and using small gentle circular motions polish. The flat wheel type mops are perfect for polishing thin grooves
You will need to do this several times to build up the finish
Painting!!??
Okay lets get one thing straight I Do not Paint my timber ( normaly!! ) but if I was going to then after I had sanded down I would apply a coat or two of gesso, then paint onto this. No you do not need to go to an art shop and by lots of little pots of the stuff. I find you get very good results from making your own, Take pva glue and plaster of paris thin the glue with a little water and sieve in the plaster mix well, you can make it thick so that it can be textured or fill small cracks or thin its up to you just let it dry properly before you try to paint it
Have fun